Introduction
In this era of diversity in the latest technology, the ability to learn and be equipped with languages is the most challenging and exciting thing for a developer or a geek. As a .NET developer, I found it interesting to start with python, an open-source programming language using the microsoft IDE, the latest being Visual Studio Code. There are many reasons to choose and learn python as my choice out of the box now since Machine Learning is the newest! Python is the best programming language and is lightweight to use. It is my personal choice to choose python. Enough talk; let’s start with what python is and some facts about python.
Python?
It’s an interpreted language that follows object-oriented principles. Now, a lot of technical terms are being used. I know C# (programming language) is currently interpreted into bytecode and then compiled by the common language runtime. In contrast, python is a wholly interpreted language, which means it is executed directly at the runtime, unlike the compiled language, which first gets compiled into the assembly language that any CPU can understand. Python is considered one of the best rapid application development programming languages. It is easy for me to learn python so far, though it is just the beginning. Its semantics are diversified, making it easy and strict for the developers to follow the coding convention. The indentation is part of its syntax, and the semantics are modular, making it somewhat more convenient for the developers to maintain the code.
Setting up python
Here, I will share the process to set up python on windows. First of all, check if python is pre-installed on your system. To check that, open command prompt and type python. If the output is undesirable, i.e., ‘python’ is not recognized, it is not installed to that path.
To download and install python, click the link below: Download python for windows. Once downloaded, install the python file with the .msi extension in a path, navigate to the same path in the command prompt, and type Python there. This output would show python with the version installed, and we are ready to write our first “hello world” program and follow the tradition.
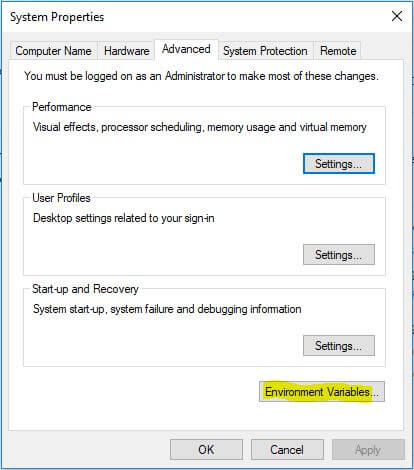
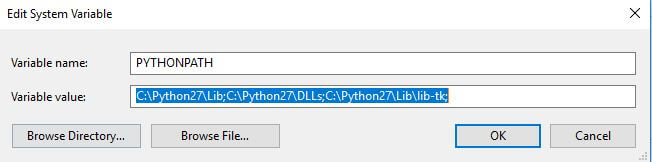
But before that, one of the essential things to be done is setting up the environment variables or the system path. This is mainly required in UNIX and windows because the OS searches for the executable in the specified path in the environment variables set. In macintosh, the path is handled by the installer. Thus, the below images would guide the set of the variables.
Now, we are all set for Python to run on Windows Command Prompt with the first “hello world” program.
To develop applications using python, we would need python IDE. There would be many in the market, but after being obsessed with Microsoft products, I prefer to use the open-source IDE by microsoft, Visual Studio Code.
Get started with Visual Studio Code.
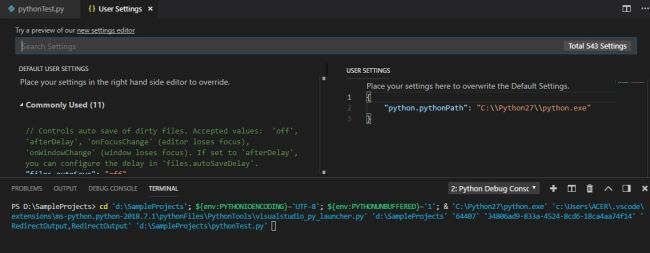
After setting up python on windows, we must install the python extension for Visual Studio Code. Once the extension of python for the Visual Studio code is installed, open Visual Studio Code and go to Files->Preferences->Settings. Once navigated, the user settings window pops up.
Once you see this window,

Search for the “python.pythonPath”. There would be Default Settings for the variable, now change the path to the installed folder path on your system.
- //Default settings
- // Path to Python, you can use a custom version of Python by modifying this setting to include the
- full path.
- “python.pythonPath”: “python”
Path is changed under User Settings too.
- //User Settings
- {
- “python.pythonPath”: “C:\\Python27\\python.exe”
- }
Now, we are all set to run any application on the Visual Studio Code in Python. Type python in the IDE terminal below; the output is as below.

When we navigate to the extensions, we can see python is enabled with the linking and debugging extension. These are used for IntelliSense, which is why I love Visual Studio. Also, a few modules/packages are third-party but can be used as these are all open-source. Just like in .NET, we have NuGet package manager. So, in the terminal itself of the IDE, we can install any python modules, like with the command below.
- > Python -m pip install hippie
The above was one of the examples. The detailed discussion is out of this article’s scope. We will discuss this in upcoming articles of this series. Now, let’s go ahead without wasting much time. Create a small program in python and execute that to see the output.
- class Car(object):
- “””
- blueprint for car
- “””
- def __init__(self, model, color, company, speed_limit):
- self.color = color
- self.company = company
- self.speed_limit = speed_limit
- self.model = model
- def start(self):
- print(“started”)
- maruti = Car(“Ertiga”,”White”,”Maruti Suzuki”,140)
- maruti.start()
This is a simple program where we have a class named “Car” with a method as start that prints “started”. We will learn more about the properties and constructor in the next article. Maruti is the object instantiated and then the method start() is invoked through it. Thus, debugging this will give the output “started”.
Conclusion
Next, we will discuss the details and basics of python in the upcoming articles of this series.
Next recommended article python functions overview
I will explain how to create and call functions in python in this article.


